-
TIL-2024.03.16 - 3js - 3D 케릭터 만들기 - 1> Frontend/ThreeJS 2024. 3. 18. 01:05

목표:
- gltfLoader를 통한 모델 불러오기
- progressive bar - LoadingManager를 사용하여, 3D 모델 불러오는 중, 프로그레시브 바 표현
- 캐릭터 애니메이션 및 컨트롤 추가
gltfLoader를 통한 모델 불러오기:
/*GLTF Loader*/
const gltfLoader = new GLTFLoader(loadingManager); // GLTF 로더를 생성합니다.
const gltf = await gltfLoader.loadAsync("./models/character.gltf"); // GLTF 모델을 비동기적으로 로드합니다.
const model = gltf.scene; // GLTF 모델의 씬을 가져옵니다.
model.scale.set(0.1, 0.1, 0.1); // 모델의 크기를 조정합니다.
model.traverse(obj => { // 모델의 각 객체를 순회하면서
    if (obj.isPush) obj.castShadow = true; // 그림자를 생성할 객체에 그림자를 캐스팅합니다.
});
scene.add(model); // 씬에 모델을 추가합니다.

camera.lookAt(model.position); // 카메라가 모델을 바라보도록 설정합니다.
LoadingManager를 사용하여, 3D 모델 불러오는 중, 프로그레시브 바 표현:
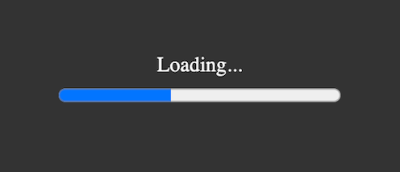
1. index.html에 태그 생성
// index.html

... 중략 ...

<div id="progress-bar-container">
  <label for="progress-bar">Loading...</label>
  <progress id="progress-bar" value="0" max="100"></progress>
</div>

... 중략 ...
2. main.js에 progressive bar 생성
/*Loading Manager*/
const loadingManager = new THREE.LoadingManager(); // 로딩 매니저를 생성합니다.
loadingManager.onProgress = (url, loaded, total) => { // 로딩 진행률이 업데이트될 때마다 호출됩니다.
    progresssBar.value = (loaded / total) * 100; // 로딩 진행률을 업데이트합니다.
};
loadingManager.onLoad = () => { // 모든 리소스가 로드되면 호출됩니다.
    progressBarContainer.style.display = "none"; // 프로그레시브 바 컨테이너를 숨깁니다.
};
3. 완성
캐릭터 애니메이션 및 컨트롤 추가:
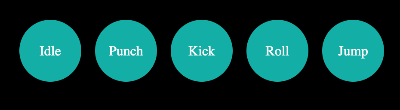
1. index.html 에 .actions div 태그 생성
<div class="actions"></div>2. main.js에 각 버튼에 대한 명령 생성
/* Button for combat animations */
const buttons = document.querySelector(".actions"); // 액션 버튼 컨테이너를 가져옵니다.
combatAnimations.forEach(animation => { // 각 전투 애니메이션에 대해 반복합니다.
    const button = document.createElement("button"); // 버튼을 생성합니다.
    button.innerText = animation.name; // 버튼의 텍스트를 설정합니다.
    button.addEventListener("click", () => { // 버튼에 클릭 이벤트를 추가합니다.
        const previousAction = currentAction; // 이전 액션을 저장합니다.
        currentAction = mixer.clipAction(animation); // 현재 액션을 설정합니다.
        if (previousAction !== currentAction) { // 이전 액션이 현재 액션과 다른 경우
            previousAction.fadeOut(0.5); // 이전 액션을 페이드 아웃합니다.
            currentAction.reset().fadeIn(0.5).play(); // 현재 액션을 재생합니다.
        }
    });
    buttons.appendChild(button); // 버튼을 액션 버튼 컨테이너에 추가합니다.
});
3. 버튼 CSS
body {
    margin: 0;
    padding: 0;
}

* {
    box-sizing: border-box;
}

button {
    border: none;
    margin: 0;
    padding: 0;
    width: auto;
    overflow: visible;
    background: transparent;
    color: inherit;
    font: inherit;
    line-height: normal;
    outline: none;
    cursor: pointer;
    -webkit-font-smoothing: inherit;
    -moz-osx-font-smoothing: inherit;
    -webkit-appearance: none;
}

.actions {
    position: absolute;
    left: 50%;
    bottom: 120px;
    transform: translateX(-50%);
    display: flex;
    justify-content: center;
    width: 100%;
}

.actions button {
    width: 72px;
    height: 72px;
    border-radius: 50%;
    color: white;
    background-color: rgba(11, 217, 206, 0.8);
    cursor: pointer;
}

.actions button:not(:first-child) {
    margin-left: 16px;
}

#progress-bar-container {
    position: absolute;
    top: 50%;
    left: 50%;
    transform: translate(-50%, -50%);
    display: flex;
    flex-direction: column;
    justify-content: center;
    align-items: center;
    width: 100%;
    height: 100%;
    background-color: rgba(0, 0, 0, 0.8);
    color: #ffffff;
}

#progress-bar {
    width: 30%;
    height: 2%;
    margin-top: 4px;
}
4. 완성
'> Frontend > ThreeJS' 카테고리의 다른 글
TIL-2024.03.17 - 3js - 3D 케릭터 만들기 - 2. Raycaster (0) 2024.03.18 TIL-2024.03.15 - 3js - 3D 공간 만들기 (0) 2024.03.17 TIL-2024.03.14 - 3js - Interactive Card - 1. 카드 모형 만들기 (0) 2024.03.14 TIL-2024.03.12 - 3js - Fonts - 3 (0) 2024.03.12 TIL-2024.03.11 - 3js - Fonts - 2 (0) 2024.03.11