-
20221227화_공부 일지> Backend/NestJS 2022. 12. 28. 02:53
1. 유저 서비스 인터페이스
1) 기존에 생성되어 있던 create-user-dto에 생성과 관련된 dto 정의
export class CreateUserDto {
    readonly name: string;
    readonly email: string;
    readonly password: string;

}
2)
curl -X POST http://localhost:3000/users -H "Content-Type: application/json" -d '{"name": "name_example", "email":"email@example.com","password":"1234"}'
유저를 생성했습니다. {"name":"name_example","email":"email@example.com","password":"1234"}%
3) UserController에서 사용될 dto 및 UserInfo 정의
export class UserLoginDto{
    email: string;
    password: string;
}
export class VerifyEmailDto { signupVerifyToken: string; }export interface UserInfo{ id: string; name: string; email: string; }2. 핵심 도메인 로직을 포함하는 Provider (p65~)
1) 프로바이더: 횡단 관심사를 사용해 비즈니스 로직을 분리하는데 (AOP 개념), 비즈리스 로직을 수행하는 곳
(sewrvice, repository 등 여러가지 형태 존재)
2) UserController에서 비즈니스 로직을 수행하는 것이 아닌 UserService에서 수행
-> 해당 부분에서 유저 서비스에 회원 가입 로직을 구현하기 위해, 다음과 같은 과정을 거칠 예정입니다.
2-1) UserService 작성 및 import
-> npm i uuid. // 이메일 검증 시, 필요한 토근 형식을 uuid로 설정
-> npm i --save-dev @types/uuid
-> npm nodemailer // 이메일로 메일 전송
-> npm @types/nodemailer --save-dev
import { Injectable } from '@nestjs/common';
import { CreateUserDto } from './dto/create-user.dto';
import { UpdateUserDto } from './dto/update-user.dto';
import * as uuid from "uuid"
import {EmailService} from "./email.service";


@Injectable()
export class UsersService {
  constructor(private emailService: EmailService) {}
  async createUser(name: string, email: string, password: string) {
    // await this.checkUserExists(email);
    const signupVerifyToken = uuid.v1();
    await this.saveUser(name, email,password, signupVerifyToken);
    const res  = await this.emailService.sendMemberJoinVerification(email, signupVerifyToken);
    return res
  }
  private checkUserExists(email: string){
    return false;
  }

  private saveUser(name: string, email: string, password: string, signupVerifyToken: string){
    return;
  }

  private async sendMemberJoinEmail( email: string, signupVerifyToken: string) {
    return this.emailService.sendMemberJoinVerification(email,signupVerifyToken)
  }


  //   return 'This action adds a new user';
  // }
  // findAll() {
  //   return `This action returns all users`;
  // }
  //
  // findOne(id: number) {
  //   return `This action returns a #${id} user`;
  // }
  //
  // update(id: number, updateUserDto: UpdateUserDto) {
  //   return `This action updates a #${id} user`;
  // }
  //
  // remove(id: number) {
  //   return `This action removes a #${id} user`;
  // }
}
2-2) UserService에서 사용하는 EmailService 및 interFace 생성.
import { Injectable } from '@nestjs/common';
import  Mail = require('nodemailer/lib/mailer');
import * as nodemailer from 'nodemailer'

// 메일의 옵션 타입 (interface로 정의)
interface EmailOptions  {
    to: string,
    subject: string,
    html: string
}
@Injectable()
export class EmailService {
	// 해당 class에서 import한 mail를 사용하기 위해서 생성자로 설정
    private transporter: Mail;
    constructor() {
        this.transporter = nodemailer.createTransport({
            service: 'gmail',
            auth: {
                user:  'G-MAIL 이메일 주소',
                pass: 'G-MAIL 이메일 비번 > 2차 비번'
                // nodemailer는 간단한 이메일 전송 테스트만을 위해 작성되었기 때문에, 2단계 인증 활성화 및 앱 비밀번호를 진행해야됨
            }
        })
    }

    async sendMemberJoinVerification(emailAddress: string, signupVerifyToken: string){
        const baseUrl = 'http://localhost: 3000'
        const url = `${baseUrl}/users/email-verify?signupVerifyToken=${signupVerifyToken}`;
        const mailOptions: EmailOptions = {
            // payload로 받은 email 받을 주소
            to: emailAddress,
            // 제목
            subject: '가입인증 메일',
            // 메일 본문
            html: `
                가입확인 버튼을 누르시면 가입인증이 완료 됩니다. <br/>
                <form action="${url}" method="POST">
                <button>가입 확인 버튼</button></form>
            `
        }
		// transporter를 통해서 이메일 전송
        return await this.transporter.sendMail(mailOptions);
    }


}
=> 2차 비번 설정을 위해서 아래 참고
2-3) Provider 인스턴스 역시, Module에 등록
import { Module } from '@nestjs/common';
import { UsersService } from './users.service';
import { UsersController } from './users.controller';
import {EmailService} from "./email.service";

@Module({
  controllers: [UsersController],
  providers: [UsersService, EmailService]
})
export class UsersModule {}
3. 결과
curl -X POST http://localhost:3000/users -H "Content-Type: application/json" -d '{"name": "name_example", "email":"email@example.com","passworrd":"1234"}'
createUser::: {
accepted: [ 'email@example.com' ],
rejected: [],
envelopeTime: 1149,
messageTime: 1412,
messageSize: 787,
response: '250 2.0.0 OK 1672163524 z15-20020a63190f000000b0046ffe3fea77sm8156882pgl.76 - gsmtp',
envelope: { from: '', to: [ 'email@example.com' ] },
messageId: '<생략>'
}으로 UserController에서 결과값을 잘 받을 수 있다.
[추가 내용]
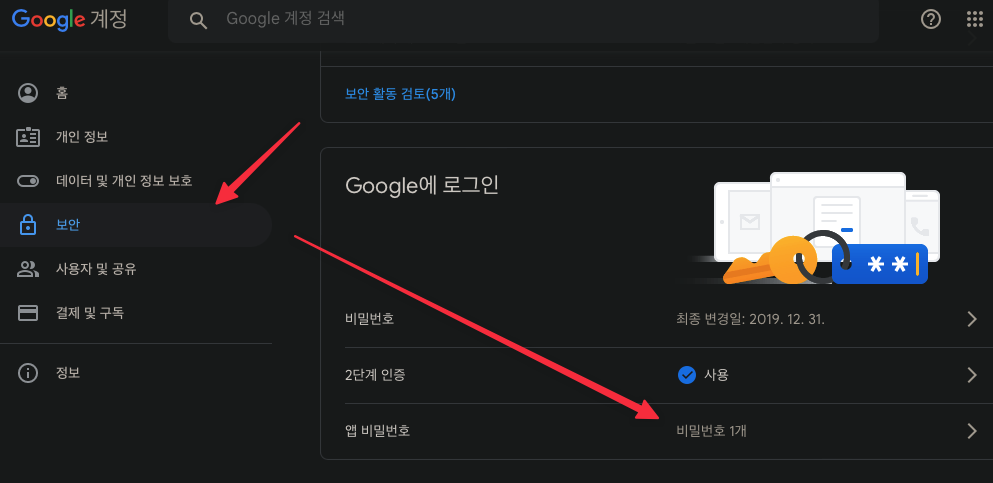
해당 사진에서 2단계 인증 & 앱 비밀번호 두개다 on 으로 설정한다. 
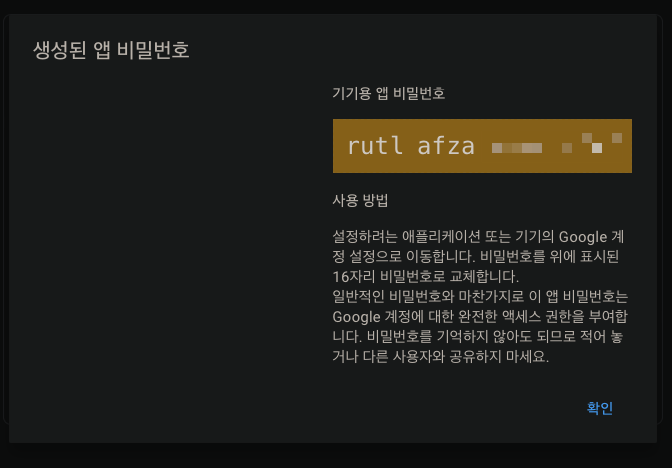
여기서 나오는 기기용 앱 비밀번호를 auth > pass 에 써줄것
https://www.cckn.dev/dev/2000-9-nodemailer/
nodemailer로 Gmail 보내기(+ 보안문제 해결)
nodemailer로 이메일 보내기 nodeJS에서 이메일을 보내는 용도로 nodemailer라는 라이브러리를 사용할 수 있다. nodemailer 설치 nodemailer로 이메일 전송 Gmail 보안 관련 에러 메세지 google 계정이 2단계 인증
www.cckn.dev
https://github.com/HeathChang/personal_work/commits?author=HeathChang&since=2022-12-27&until=2022-12-28
'> Backend > NestJS' 카테고리의 다른 글
20221229목_공부일지 (0) 2022.12.30 221228수_공부일지 (0) 2022.12.29 20221222Thu_공부 일지 (0) 2022.12.23 20221221Wed_공부 일지 (0) 2022.12.22 009_TypeORM을 NestJS에 연결 - 1 (0) 2022.05.27